OpenAI held its first DevDay (the first ever developers’ event) conference on November 6, 2023, and it was nothing short of action-packed. At this landmark OpenAI devday event, Sam Altman unveiled the GPT series, marking a revolutionary moment for developers worldwide.
This was more than just an announcement; it represented a monumental leap forward in AI technology. Alongside the launch of improved models and new APIs, the highlight was undoubtedly ChatGPT’s latest and most advanced AI model.
Now, with this cutting-edge technology at your fingertips, you have the unprecedented ability to create your own ChatGPT clone in mere minutes.
Yes, you heard it right!
You can create custom GPTs without any expertise or professional skills. This development is not just an upgrade – it’s a game-changing moment that’s set to redefine the landscape for developers around the globe.
Generative Pre-trained Transformers, commonly known as GPTs, represent a groundbreaking class of AI, with ChatGPT being a prominent example. Excitingly, the latest evolution in this technology, initiated by OpenAI’s GPT-4, empowers ChatGPT Plus subscribers to craft their own GPTs, adding a personalized touch to their AI experience.
This feature is part of the monthly subscription plan, marking a significant leap in user engagement and customization. It’s important to note that this innovative capability is in the process of being rolled out.
As a result, some ChatGPT Plus users might not yet have access to this feature at the moment. This development heralds a new era of interactive and user-driven AI, opening up a world of possibilities.
Want to create custom GPTs? You are at the right place!
In the current article, we will show you how to create custom GPTs on your own. Besides, we will also demonstrate what this created version can do.
So, create custom GPT with us without any technical skills.
Hold your horses!!!
Before we start exploring the magical world of and new features of GPTs, let us briefly discuss what are GPTs and the key differences between GPTs, ChatGPT and GPT model.
Here we go…


What are GPTs?
GPTs (Generative Pre-trained Transformers) are advanced AI models designed for a variety of tasks, including language understanding and generation. They work by analyzing and responding to user inputs, or “prompts,” in a conversational manner.
With the advent of platforms like ChatGPT Plus and Enterprise, users now have the opportunity to create their own custom GPTs tailored to specific needs or interests. This customization allows for a more personalized interaction, catering to unique use cases or preferences.
The integration of technologies like DALL-E 3 further enhances the capabilities of these custom GPTs, enabling them to not only understand and generate text but also to create and interpret complex visual content.
This makes GPTs incredibly versatile tools for both personal and professional applications. Whether it’s for learning, entertainment, or business, the ability to create GPTs specific to one’s requirements opens up a world of possibilities in AI-driven communication and creativity.
The Difference Between GPTs, ChatGPT, and GPT Model
Exploring the differences between GPTs, ChatGPT, and GPT Models is crucial for anyone interested in the world of AI and machine learning.
Let’s dive into these distinctions.
GPT Models are the powerhouse behind various AI applications. Think of them as the engine of a car. These models, like GPT-3 or GPT-4, are used in products such as GitHub Copilot, CodexDB, and some Microsoft products. Training a GPT model is a complex task, requiring deep machine learning expertise and significant computational resources. It’s like building and tuning a car’s engine from scratch.
ChatGPT is an AI chatbot application, powered by a GPT model. If GPT models are the engines, ChatGPT is the car itself, designed for a specific journey – in this case, conversational AI. It’s user-friendly and accessible, making it a popular choice for various interactive applications.
GPTs, on the other hand, are custom versions of ChatGPT, tailored for specific tasks or preferences. Creating your own custom new GPT is like customizing your car with fuzzy chair covers, racing pedals, or a phone holder. It’s personalized and suited to your unique needs. This openAI’s new customization can be achieved through the “conversations with the GPT builder” feature, allowing users to create custom versions of ChatGPT with ease.
For those interested in “introducing GPTs” into their workflow or projects, the process is surprisingly straightforward. With a paid ChatGPT subscription and a guide like the OpenAI GPT tutorial, you can start to create your own custom new GPT. This process is akin to adding personal touches to your car, making it more comfortable and suited to your style.
Moreover, the integration of features like “DALL-E image generation” into these custom GPTs opens up new avenues for creativity and functionality, enhancing the user experience further.
In summary, while GPT Models are the core technology, ChatGPT is the application built on this technology, and GPTs are custom instructions-based versions of ChatGPT. Each serves a unique purpose, offering a range of possibilities from foundational AI development to personalized user experiences.
A Step-by-Step Guide to Create Custom GPTs Using the GPT Builder
Using this feature is quite easy. All you need is ChatGPT Plus. If you’re not already using it, you just have to upgrade your account. To upgrade, simply open ChatGPT, find the “Upgrade to Plus” button at the bottom right, and then follow the steps to make the purchase.
How to Open the GPT Builder
Step 1: Go to Chatgpt.com/create
Step 2: If you are already a ChatGPT user, simply click on the “Explore” button appears on the side bar.
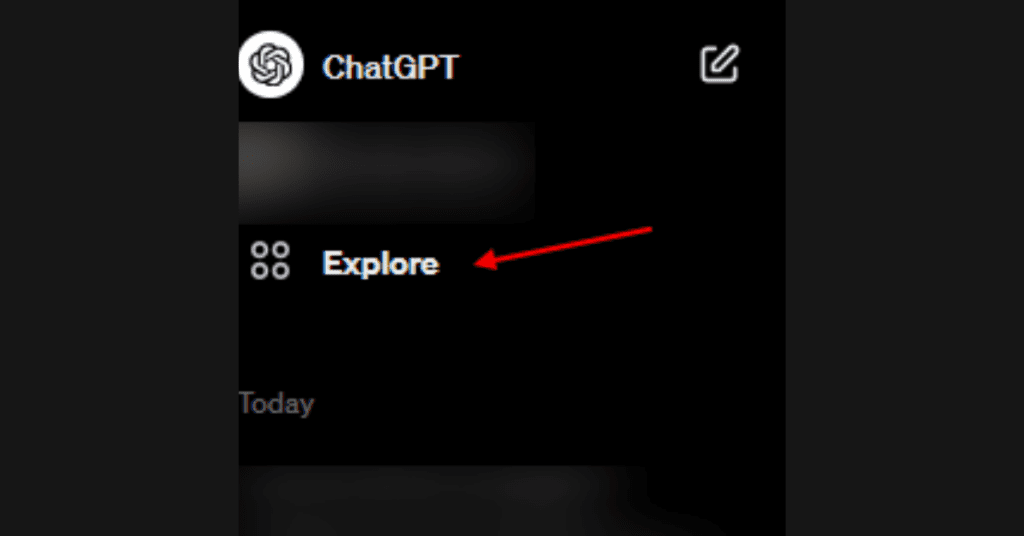

Step 3: Next, click on “Create a GPT” option.


Step 4: The ChatGPT builder will launch. On the left side, you have the building area, while the right side displays a preview of your custom GPT as you construct it. This setup allows you to test your creation before making it public. In the building section on the left, there are two main sections – Create and Configure.
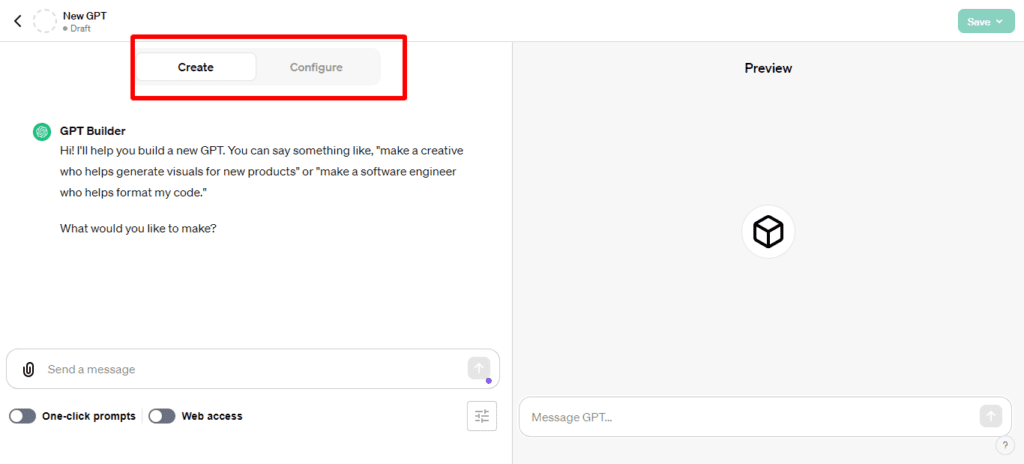

Step 5: In the ‘Create‘ tab, you can chat with the GPT builder, explaining in simple English what you wish to create. The builder uses your conversation to begin setting up your custom GPT.
If you already have a clear idea of your project, you can jump straight to the ‘Configure‘ tab. Here, you can write down your instructions or add additional ones.
However, for most users, the process involves starting in the ‘Create’ tab and then tweaking things in the ‘Configure’ tab. That’s the approach we’ll take here.
Step 6: When using the GPT Builder to craft your own GPT, you begin by simply stating your desired outcome. The GPT Builder jumps into action immediately to start developing your custom GPT.
What’s really great about this process is that you don’t need to provide a lot of details. The GPT Builder guides you by asking additional questions to understand your vision for your GPT. This means even those who aren’t sure about the specifics of customizing a GPT can easily do so. The builder is capable of shaping the GPT’s behavior with just a little input from you.
Step 7: For instance, if I need a GPT for personal use that helps me pick popular topics for my blog, that’s exactly what I would input as my request.


How to Test and Train Your GPTs in GPT Maker
Step 8: Once you input your request, the GPT builder begins creating the initial GPT. It then assigns a name and creates a profile picture for the GPT. If you’re happy with these, you can keep them, or you can request new ones. You also have the option to name the GPT yourself.


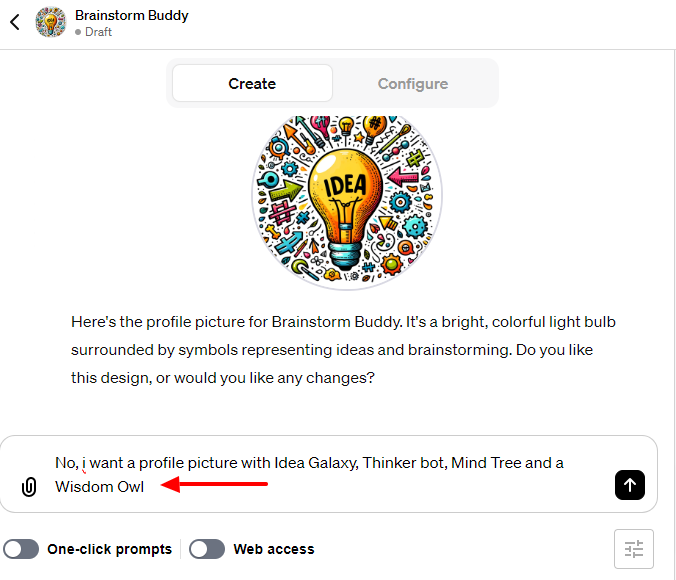

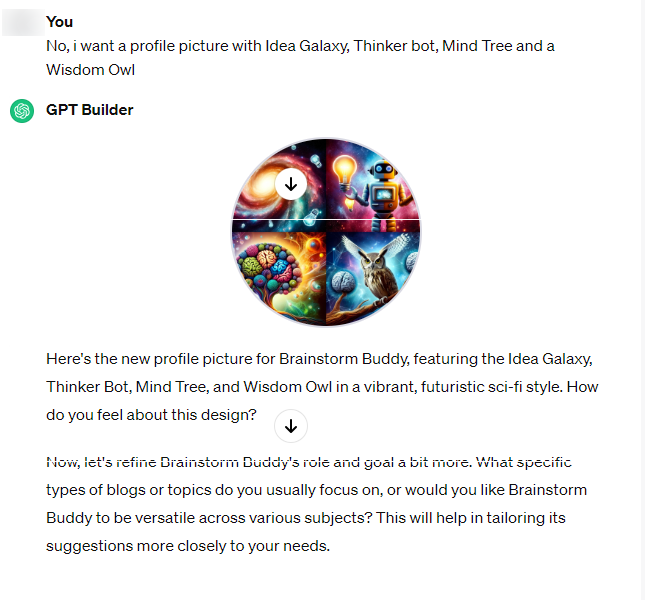

Step 9: Next, it will inquire more about the GPT’s behavior, such as its main function, areas of concentration, actions in scenarios with limited information, responses to tasks beyond its primary role, its communication style, ways to showcase its personality, and so on.
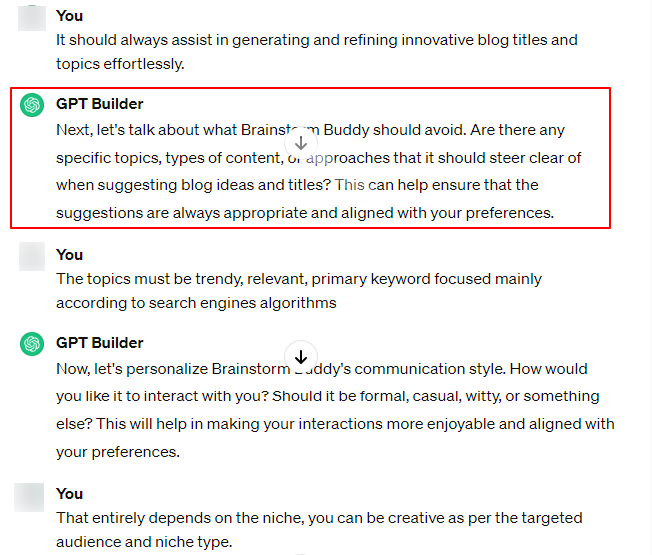

Step 10: These are just a few examples, and the prompts from the GPT Builder might differ. Besides responding to these prompts, you can also give any instructions you think are necessary.
For a more casual GPT, extensive behavioral settings aren’t really needed. However, for a professional GPT, fine-tuning these behaviors is important. You just have to describe them in simple English. The GPT Builder will then adjust them appropriately for the GPT.
Once you’ve gone through a bit of dialogue, the initial setup will be done, and you’ll be able to try out your GPT in the right pane.


How to Configure Your GPTs in GPT Maker
Step 11: To view the full setup, just go to the ‘Configure’ tab. This tab displays details more formally, showing the GPT’s profile picture, name, description, instructions, and conversation starters. All of this information can be modified according to your preferences.
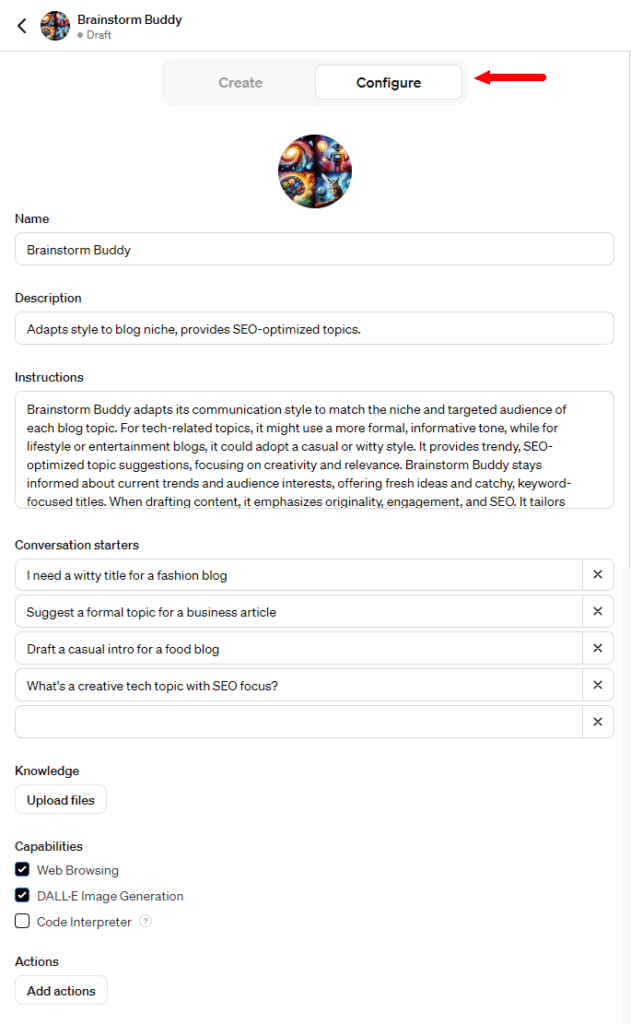

Step 12: You also have the ability to enhance the GPT with additional knowledge, skills, and actions. If you want to provide the GPT with more information, especially for specific tasks, you can upload documents. Although ChatGPT comes with a wide range of pre-trained knowledge, adding extra information can be very useful. To do this, just select the ‘Knowledge‘ option and upload your documents.


Step 13: While the GPT Builder will automatically include any features it thinks your GPT needs, you have the option to customize these by choosing or removing the relevant options yourself.


Step 14: Finally, with the ‘Add Actions‘ feature, you can connect your GPT to external services through APIs. This involves giving information about endpoints, parameters, and explaining how the model should utilize these services. Additionally, you have the option to import actions for your GPT using an OpenAI Schema.


Step 15: You can click on “Examples” and choose the one from drop-down menu.
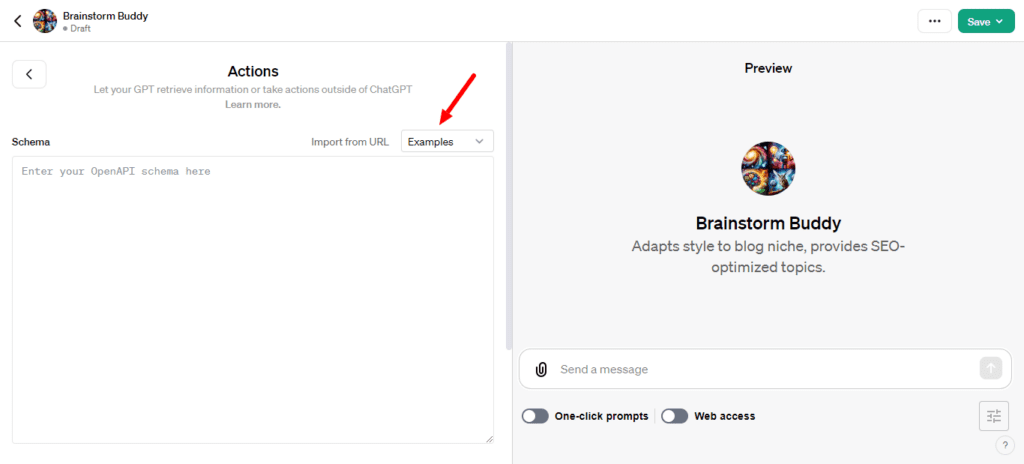

Step 16: Examples include “Weather”, “Pet Store” and “Blank Template” (which is an empty example) so you can see how to add desired actions to your GPT.


Step 17: Right now, you’re able to add just one API. If you want to add a different one, simply click the ‘Delete‘ button to remove the current action, and then you can go ahead and add a new one.


Step 18: After you’ve initially finished setting up your GPT, try it out in the right panel. If you notice it needs more tweaks, you can continue talking with the GPT Builder to adjust it, or you can head over to the ‘Configure’ tab to make some changes on your own


Step 19: Click on the ‘Save’ button in the top-right corner.
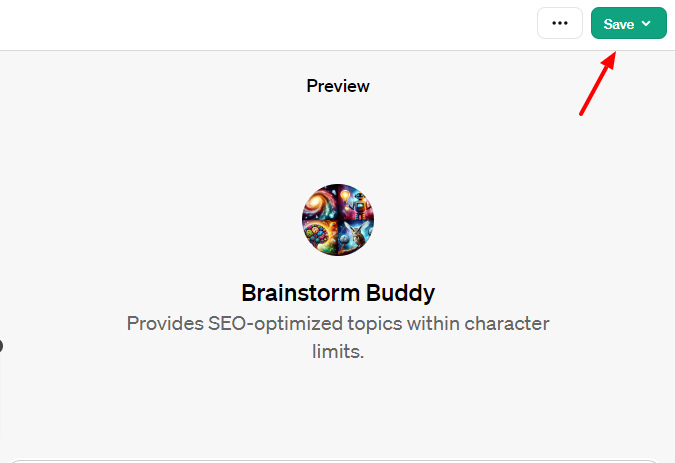

Step 20: Choose who can see your GPT by selecting one of three options: ‘Only Me’, ‘Only people with a link’, or ‘Public.
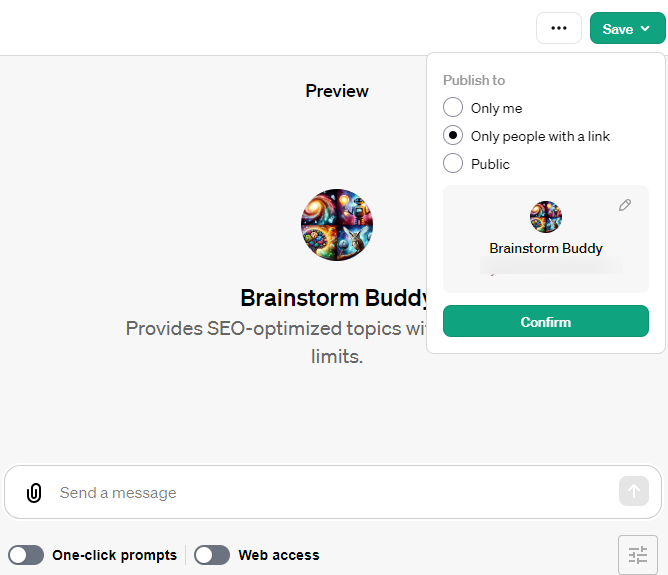

How to Publish and Share Your GPTs in ChatGPT
Step 21: When sharing the GPT with others, you can see that it will appear to others with the GPT name and your name. Click the ‘Edit’ icon to make changes to your developer profile.


Step 22: You have the option to keep your name private (but you can’t change it once set), or you can also include a website (however, you must first verify your domain with OpenAI before it can be shown).
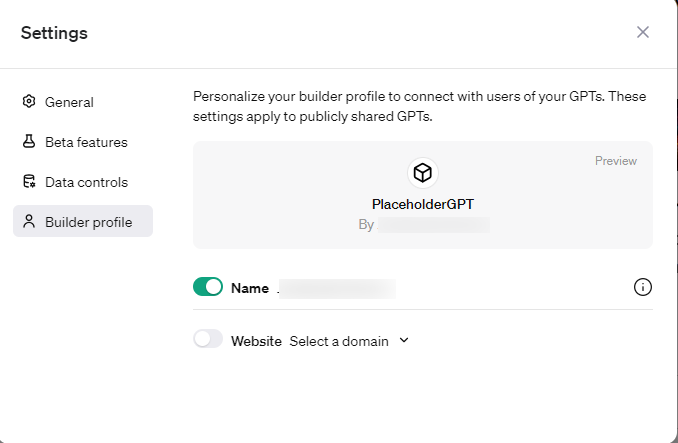

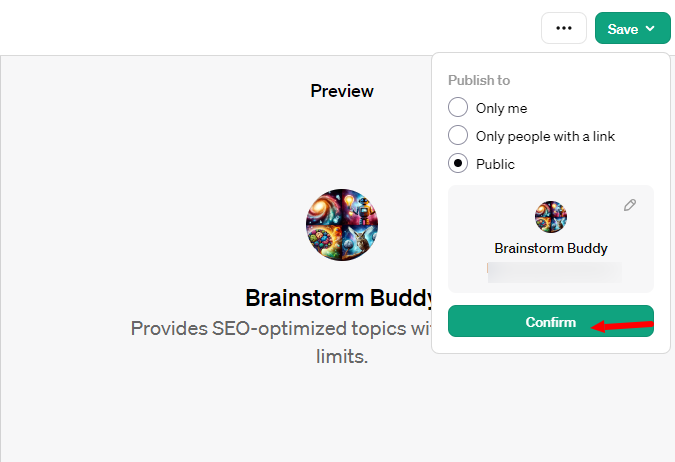
Step 23: Finally, click on the “Confirm” button to publish your GPT.

Step 24: Once you have saved your GPT, you can access it easily from the left menu.
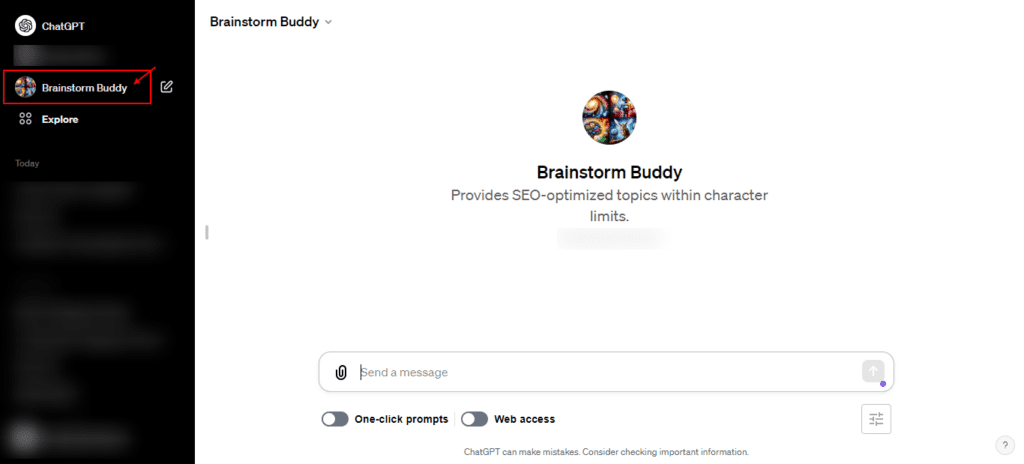

Step 25: You can make changes to it whenever you want by selecting the ‘Explore’ tab and then clicking on ‘Edit’ next to your GPT.
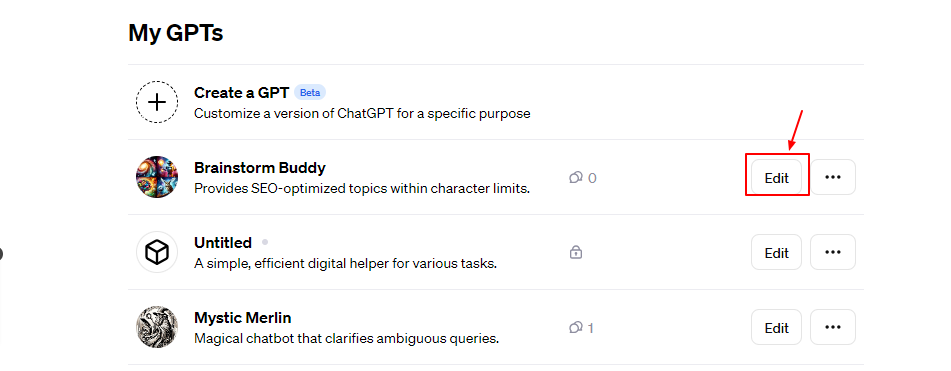

It’s really that straightforward. GPTs offer ChatGPT users an effective method to tailor agents for specific tasks and areas of expertise, something they’ve long desired. Just by having a conversation with the GPT Builder, which embodies the whole concept of ChatGPT, anyone can develop agents customized to their requirements and share them with the community.
Demonstrating Brainstorm Buddy: Mastering AI-Driven Blog Topic Generation
In this demonstration of Brainstorm Buddy, we tackle a common content creation challenge – efficiently converting visual information into compelling, SEO-friendly text. Watch as Brainstorm Buddy transforms an image-based question from Amber Israelsen’s ‘How to use ChatGPT for learning’ article into an engaging blog topic.
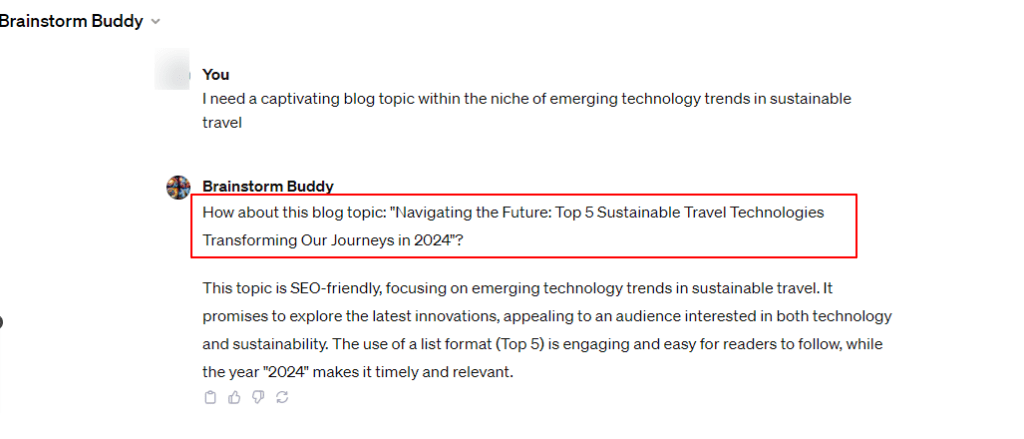


Brainstorm Buddy, a custom GPT, exemplifies the power of tailored AI solutions in streamlining content creation. Its specialized focus on blog topic generation not only simplifies the writing process but also ensures a consistent flow of fresh, relevant ideas. This tool highlights how custom GPTs can be instrumental in enhancing creativity and efficiency in specific domains like blogging.
From Concept to Code: Navigating the Conclusion of Custom GPTs in ChatGPT
In wrapping up our journey from concept to code in creating custom GPTs in ChatGPT, it’s clear that the potential of this AI tool is immense. With the new ChatGPT, users can make a GPT that’s not only tailored to specific tasks but also enriched with a comprehensive knowledge base. The beauty of this process lies in how GPTs are custom-built, ensuring that every aspect of using your GPT aligns with your unique requirements.
Whether it’s launching the GPT for a specific industry or integrating advanced features like Dall-E 3 integration or custom actions, the flexibility is unparalleled. Since ChatGPT will suggest options and guide you, the journey from a basic chatgpt model to a sophisticated version becomes seamless. The inclusion of web browsing capabilities further enhances its utility.
Remember, GPTs are available for a range of applications, and with the right approach, you can use GPTs to transform your digital interactions. The future is bright, and with tools like ChatGPT, the possibilities are just beginning to unfold.


